I don't know what the perfect coyote rifle is. I do know that anyone will feel confident and shoot better with a rifle they are comfortable with. I purchased a Savage 110 a few years back for a really good price, brand new for $180. I found it at a Wal Mart, they wanted me to have it so bad they kept marking it down until I folded and bought the rifle. It is a Sierra model with black synthetic chambered in .270 Win. I know some of you just went, "Oh my God!", but I like this flat shooting caliber and without a doubt it will take down a 'yotie over some yardage. I don't believe you can make a coyote too dead.
This is an early model without the accutrigger. So, the first order of business was working the trigger to an acceptable and reasonable pull. I little time with the allens and very little polishing turned out a clean break and workable pull weight. I don't carry a feather light trigger in the field. (A note of caution: If you do not know exactly what to do with a trigger group, leave it alone or seek a competent smith. If not done correctly the safety may not work or the firearm may become unsafe.)
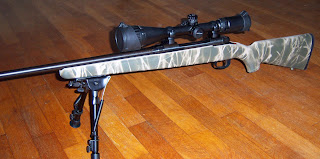
I have shot this rifle and become very comfortable with it. I have recently mounted a mil-dot scope w/lighted reticle and target turrets. It is a Center Point brand, it was cheap for the features and I will see how it performs and holds up. I would like to have a Leupold MK-IV, but am seriously lacking those funds. I have kids to put through college!
The most recent addition has been a bipod and camo job. I used the "ultra flat" camo paint from Wal-Mart. I chose the tan and drab green, black just isn't a natural color unless it is night.
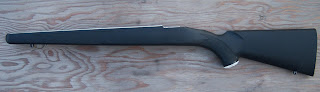
First I removed the action, trigger guard, butt pad, and all the screws. At this point I soak it down with Simple Green and wash it, this degreases everything so the paint will stick. I dried it with a towel and then used compressed air to make certain all the water was out of the screw holes and corners. A little moisture would likely ruin the paint job and any oil will certainly keep it from sticking.
After degreasing the stock and drying, I masked off the grip cap and inside the barrel channel and bedding area. I may glass bed this someday and don't want to scrape paint away to do it.

 And then the black stock became a tan "ultra flat" stock...apply a nice even coat of the tan.

The next step was to apply the "stencil".....

I used some dead grass that grows tall and thick in a waterway near my barn, I believe it is some type of fescue.

This is the resulting pattern after applying the drab green over the grass.

Here is a shot inside the stock. The entire area was masked off and therefore no paint!

This was my first attempt at a camo job on a stock. I am very pleased with the results, I just hope the Wal Mart paint holds up.
A few notes:
1. Grass does not often grow horizontal, so don't lay your pattern out that way.
2.Test your color/pattern on something before you start on your gun. I thought I knew what I wanted, turns out I used the colors backward to what I originally planned. I used a piece of 4" PVC pipe, just to see how going around the corner worked.
3.I don't like much if any black in the pattern. It just seems to make a blob that is to easily spotted. I am thinking about painting the entire action, barrel, and scope.
4. There are many products offered for coating firearms, I chose cheap and easily applied. I may try Dura Coat in the future.
5. If you are going to coat the entire weapon, don't forget to mask off markings on the scope and areas that paint may keep from operating properly. i.e.-adjustable power rings or adjustable objectives, target turrets, things that may need to move at some time.
6. Mask the end of the barrel if you are going to coat the barrel.

No comments:
Post a Comment
Keep it honest, to the point, and civil. Most of all keep it pointed in a safe direction.